5 things learned making my first complete zine
I recently published my first zine! I actually fully drafted another zine just beforehand (on letterpress printing!), but for whatever reason I finished this lasercutter cheatsheet zine draft first.
Very excited to finally finish making a zine!
I’ve drafted a couple zines online using Google Docs in the last year or so, but never completed them. (One was from notes on Miriam Posner’s cool Scholars’ Lab talk on the tech underlying the ethical choices of global logistics systems, and one was on the “#DHmakes: Baking Craft into DH Discourse” article I cowrote with Quinn Daedel and Claudia Berger.) I’ve wanted to make my own zine for a while, and I think it happened now because:
- I took a 4-day intensive letterpress printing training I was really excited about, and taking notes to help me remember what I learned each day involved a fair amount of sketching. That probably made me think of using a standard 8-page minizine layout as a way to organize the notes—that layout folds a sheet of paper into 8 parts (fold in half once across vertical axis, fold across horizontal axes to divide those two parts into eight parts).
- I realized that I liked hand-drawing/lettering the zine a lot better than I did struggling with GDocs not wanting to support zine layouts well (GDocs no longer allows custom page sizes, and its tables have issues for page sizing too; Canva felt like it would end up looking too not like my personal style, though I still want to try using it in the future.)
- I met with Ammon Shepherd, Scholars’ Lab’s makerspace expert and lead, to get a training refresh on our new lasercutter. I took a few notes on paper, then more afterward while preparing to try lasercutting something by myself the next day. Again, the combination of a sequence of steps and needing to sketch rather than write/type some parts made a zine feel comfortable as the format.
5 things I learned while drafting these two paper zines
(Noting the second zine, on letterpress printing, isn’t finished/published yet—but a first draft was done 8/2024.)
-
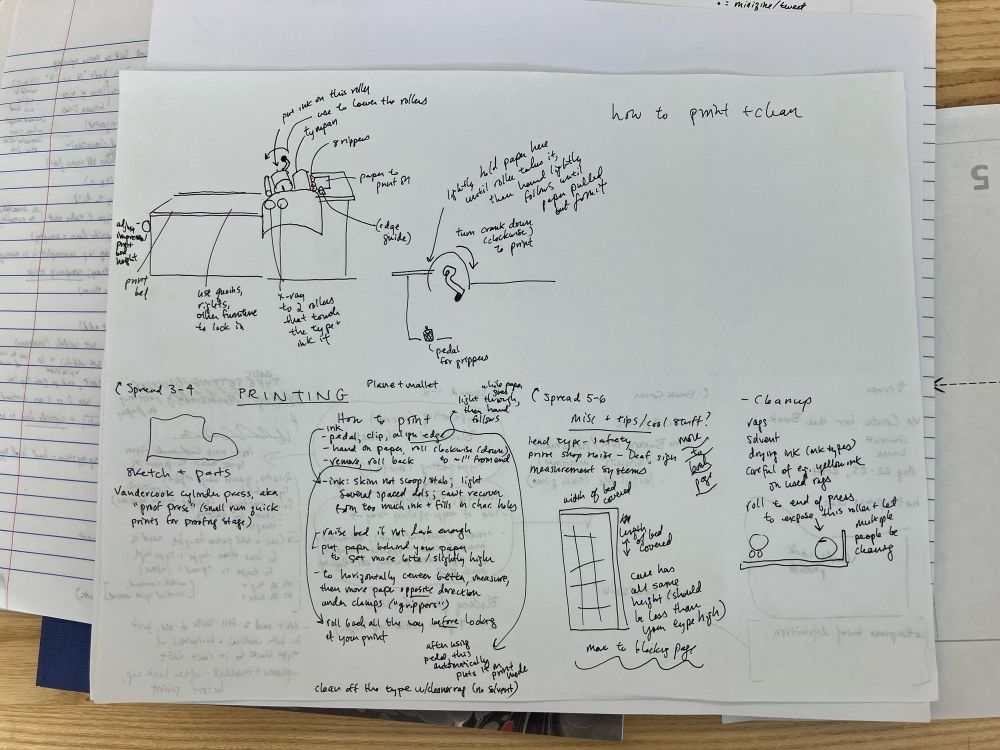
Leaving space on the sheet around each zine page, during the first draft, really helped with organizing and layout (and with not worrying too much about placing things wrong then needing to move to a new sheet of paper). For the letterpress printing zine first draft, I used both sides of the minizine-folded paper instead of the intended eventual one side, which let me use the page space below each real page as a pre-drafting zone. You can see where I drafted the idea of a Vandercook press sketch in the lower-left, then sketched the full thing in the upper-left:
For the final version of that zine, I’m switching to a larger page zine and different folding format (see #2 below) that will print to legal-size paper. I didn’t have any of that size paper yet, but I made drafting templates that fit two pages per sheet, with lot of space around them for layout notes:
-
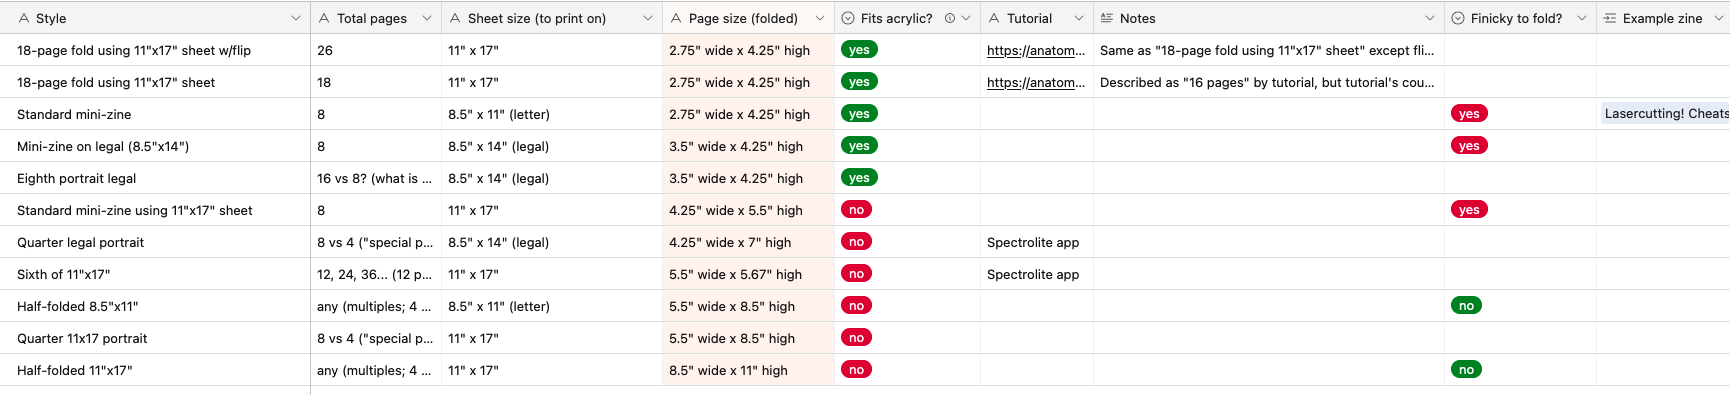
Folding standard 8-page minizines is annoying—you have to pay a lot of attention to lining up each edge, and creasing carefully. I started a table to track what different sizes of paper + folding techniques produced, in terms of final page dimensions and number of pages, so it’s easier to select something that fits my needs (such as making such a zine fits into an acrylic brochure holder I’d bought for sharing small zines).
-
I forgot to leave space around the margins for printing. The lasercutter zine PDF looks fine, but when you print (even using “borderless” or no-margin settings, on some printers) the place the printer grips the paper might not get inked, and text/images at the edges get cut off. (If you don’t fold precisely or leave space around the folding lines, stuff can get cut off/moved to the next page that way, too.) I started to use Photoshop to move things in the PDF around away from those places needing more space, so the whole zine could print. I’d assumed that simply scaling down the zine wouldn’t work, given that the folding-in-eighths would still hit in the same places on the sheet—but it occurred to me to try printing at a slightly smaller scale (96%), and that actually solved the whole issue? A little annoying to have to tell people to scale when printing, but for a first zine, that’s fine by me.
-
I enjoy doing small, neat lettering, so handlettering in the minizine’s small space was fun. I made it until the final line before my brain glitched and I wrote the wrong letter in a word. Luckily, I was able to use what I infer is a time-honored zine technique: covering the typo with a pasted-in image. I promptly purchased some whiteout, too. (And I can always fix things after scanning, using Photoshop—but I like the idea of the final paper copy being accurate to the PDF.)
-
I researched and bought a $70 scanner, so I could take better zine scans from paper zines at home. I used standardish white copier paper for the lasercutter zine, but the texture of the paper still kind of came through in the scan? So I’ll need to experiment in the future, if I want zines digitized from paper to have their backgrounds look as clean as digitally-produced zines. Or maybe just accept that’s part of the charm.